Using a linear shower drain has many benefits. You can design the tiles in your bathroom with as much freedom as you want if you have a linear shower drain. Keep reading this article to know how to remove them and keep them clean.
The benefits of using a linear shower drain cover
Here are some of them:
- Linear shower drains are sleek and have an exquisite appearance when placed among big tiles.
- Linear shower drains are very easy to clean and maintain! And who doesn’t love an easy-to-maintain thing?
- The placement of linear drains can be extremely flexible, and you will not have to worry about any barriers to your tiling or shower placement situation.
Some of the drawbacks to using linear shower drains are as follows:
- You need a certain kind of plumbing installation before installing your linear drain. You can easily do this if you pre-plan your bathroom arrangement.
- These can be tricky to take care of and require proper waterproofing of the walls and tiles before installation.
Helpful tools needed to remove linear shower drain cover
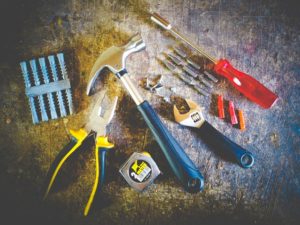
Here are some tools you will need to remove the linear shower drain cover:
- Lubricant
- Baking soda
- Vinegar
- Washcloth
- Screwdriver
- Needle nosed pliers
- Hot water
How to remove linear shower drain cover
Now that you have chosen a linear shower drain, it is crucial to know how to remove it if you ever face a blockage. Follow these easy steps to remove your linear shower drain cover:
- First, apply a generous amount of lubricant to your shower drain and let it sit for some time. You can put your lubricant in a spray to make this easier.
- Insert the tip of a needle-nosed plier into the drain cover.
- Hold the handles of the plier with both your hands. Apply force and twist it clockwise. The adhesive should come off quickly as long as you’ve put enough lubricant on it and are applying constant strength.
- However, apply more pressure on the handle if that does not work. You can also spray some more lubricant and keep it for about 10 to 15 minutes.
- You can take the cover off once the adhesive comes off. Then, finally, you can go ahead and clean your drain correctly.
If you’re still having issues, it might mean that the clog is at a deeper spot. You can use any of the following methods to clean your drain correctly.
Also read: How To Remove Shower Drain Cover
Plunger
You can use a plunger to clean deeper clogs that you cannot clean with your hands. Just fill the shower with 3 to 4 inches of water and then pump it over the drain with some force. You can repeat this 3 to 4 times if needed.
Baking soda and vinegar
You might want to go for chemical-based cleaners readily available in the market. However, you can give this home remedy a try first. Try this home remedy: Mix 1/4 cup of baking soda and 1 cup of vinegar. Leave it for 20 minutes. Finally, you can flush it down with some boiling water.
Clog remover tools
If none of these methods work, you can purchase these cheap and handy tools made explicitly for clearing clogged drains. All you need to do is push the tool down the drain and pull it back up. You can keep doing this until the tool comes back up clean.
Chemical cleaners
You can also opt for other chemical-based cleaners readily available in the market. Usually, all you need to do is pour the cleaner into the drain and leave it in for 20 minutes— post which you can flush it down with the help of some boiling water. Please remember to use a face mask and protective gloves while using chemical-based cleaners. These can also emit harmful fumes. Hence, please do not use them around kids and pets.
Also read: How to Replace Different Types of Shower Drain Cover?
Tips for Keeping Your Linear Drains Clean
Keeping your linear drain clean is an easy way to ensure you have a functioning drainage system and drain that works. In addition, it’s a great way to make sure they look like how they did when you first got them installed. Now that you have a linear shower drain installed in your bathroom, you might want to know about how to keep them clean!
- As a first step, you need to remove the drain cover.
- Take a clean washcloth or a paper towel to wipe down the drain cover. This will ensure that any scum, soap suds, or hair is wiped out.
- You will need to take a hard bristle brush next. Use this and scrub the drain cover in circular motions. Make sure that this brush isn’t too stiff and you are not scrubbing the tiles as it can leave scratches.
- Take the drain cover out with the help of the guide above.
- Lastly, thoroughly clean the drain with a plunger or a brush, so you are left with no clogs!
Linear Shower Drain Cover Replacement Techniques
To begin the installation process you should first remove the previous drain from your bathroom. Once that is done check what damage you are left with. After addressing any issues you can start with the installation process as below:
- Check the type of flooring in your bathroom and then proceed with the assembly.
- If you stay on the ground floor, you will need to first install the sewer connection. After which, you can pour the concrete. And lastly, you can fit the siphon and lay the screed.
- If it is a beam and block floor, your sewage connection is already installed during floor construction. You will need the elements which will fit into the gutter. The depth of the gutter should align perfectly with the ceiling and the siphon. The hollow brick channels are perfect for laying the piping.
- If it is a reinforced concrete floor, you will need the sewage connection to fit under the ceiling and cover it with tiles since it will not be thick enough to fit the entire system.
- Next, assemble all the elements of your linear drain. The drain has to be over the sewage pipes. You can install the drain on the wall or the floor. That is up to you. However, you need to choose the location closest to the shower panel.
- Another important thing that you need to consider is the water drop situation. In the case of a linear drain, a water drop over 2.5% should be chosen, depending on the direction of the drain.
- You will need to slope the floor from both sides if it is a point drainage system. The slope should resemble an envelope, and it should be 1.5%.
- After the floor hardens, start preparing the installation. You will need sealing tape for the siphon. You can waterproof the walls and floors with the help of a liquid film. This process is very simple. Cover the entire floor and the walls with insulation tape later.
- Finally, the last step is tiling. Please make sure you do the grouting properly. Epoxy grouts are the best ones for this job as they make sure everything is sealed perfectly.
Also read: How To Remove Shower Drain Without Screws
Wrapping Up
A linear shower drain cover is the most preferred drain cover as it looks stylish and provides you the option to go for any tile styling you want.
