A few days ago, I was taking a shower when I suddenly noticed that the water wasn’t flowing down the drain the way it usually does. After inspecting it more closely, I quickly realized that my hair and other gunk were causing a blockage. There was nothing more disgusting than standing in a puddle of dirty water! Eventually, I realized that I needed to replace a shower drain cover.
After researching and figuring out the best ways to replace a shower drain cover, I put together this guide to help you out! In this article, I’ll walk you through a ton of information on shower drain covers. For identifying the type of drain cover you have to know whether drain covers are even replaceable at all, there’s plenty to learn and know about, so let’s get right to it.
Know Your Shower Drain Cover Type
Once you’ve figured out that you need to replace your shower drain cover, the first step to learning how to replace it involves learning about the type of shower drain cover you have. I’d recommend identifying the type of shower drain cover you have. The reason for this is that when you replace it, you must ensure that you’re buying an exact copy of the drain cover you had before.
Shower drain covers typically come under two categories: drain covers with screws and drain covers without screws.
Drain Cover With Screws
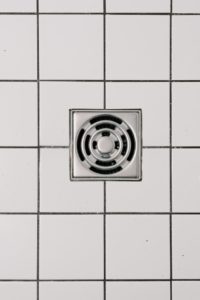
Shower drain covers often have screws on them that help them remain attached to the drain. Depending on the type of drain you have, the material that the drain cover is made of will differ. These materials include stainless steel, chrome, polished or antique brass, and bronze. The screw holes are usually placed at the center of these types of drain covers. Please remember to check if your drain cover requires screws because the screws are sold separately from the drain covers.
Some shower drain covers are considered to be more heavy-duty than others. These covers also come with screws. The only difference between the heavy-duty screws and the regular drain covers is that these are manufactured differently. They are sanded and often have slotted bars. Ordinary drain covers usually have holes.
Drain Cover Without Screws
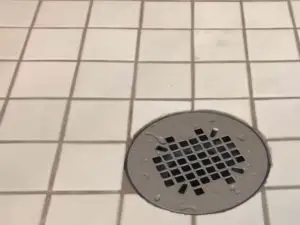
Drain covers without screws are often easier to replace than drain covers with screws. This is because all you need to do is lift the drain cover and turn it to take it out and unclog it. Like drain covers with screws, they are made of chrome, nickel, brass, aluminum, and copper.
Are Shower Drain Covers Replaceable?
Yes, they are! Shower drain covers are replaceable. They are replaceable because it makes it easy for everyone when there is a blockage or some obstruction that prevents water from flowing down the drain quickly and easily.
While some types of shower drain covers might take a little more time and effort than others to replace, all kinds of drain covers can be taken off and replaced. In some cases, you have to use your toe to push the drain down and then let it pop up. That way, you need to lift it and clean the hair and other dirt blocking the drain cover.
How To Replace Different Types of Shower Drain Cover
Replacing a shower drain cover is easier than you might think! First, we’ll take you through a list of helpful tools to help ease the drain cover removal process, followed by a few ways to replace different types of shower drain covers!
Helpful Tools To Replace a Shower Drain Cover
Before you start removing the shower drain cover, we recommend keeping all your tools at the ready so that you don’t waste time scrambling to get the cover off! We would also like to suggest that you purchase a new drain cover and keep it next to you. This way, you don’t have to worry about leaving your drain uncovered after removing the old one.
Given below is a list of some helpful tools and materials that you might need when trying to replace a shower drain cover:
A flathead or a Phillips screwdriver
This is arguably the most essential tool you need because if your drain cover has screws, you need the screwdriver to help you replace them.
Spray lubricant
This will help you loosen a drain cover if it is stuck or rusty.
Nose Pliers
The nose pliers will help you twist the drain cover to replace it. You must use them carefully when inserting them into the drain cover holes.
A Utility Knife
Suppose your plumber or previous house owner fixed the shower drain cover and sealed it with silicone caulk. In that case, you might need the utility knife to cut the caulk away so that you can easily lift the drain cover.
An old piece of cloth or paper towels
We would highly recommend that you keep some paper towels or an old piece of cloth ready before you start to replace the drain cover. The reason for this is that after you replace your shower drain cover, there’s a high possibility that a chunk of hair and other debris from your bathroom would have accumulated at the base of the drain cover. The paper towels or cloth will help you dispose of the dirt quickly.
How to Replace a Shower Drain Cover With Screws

Here’s the step-by-step process to replace your screwed-down shower drain cover:
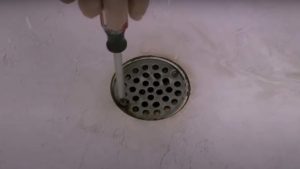
- First, you need to take the screwdriver to replace the screws holding the shower drain down and keep it in place. Firmly grip the screwdriver’s handle using your dominant hand and make sure that the screwdriver’s tip has made contact with the top of the screw.
- Next, using your non-dominant, slowly rotate the screwdriver until you loosen and eventually replace the screw. Pick the screw up and set it aside.
- Repeat steps one and two if more screws hold the shower drain cover down, and set the remaining screws aside.
- If you cannot replace the screws by using the screwdriver alone, it would be best to use the spray lubricant to help you. To do this, all you need to do is aim the nozzle of the lubricant can at the screws and spray a large amount of it.
- Let it sit for at least two to five minutes, then replace the screws using the screwdriver. Repeat step four a second with the remaining screws. To make sure that you do not lose any of the screws holding the shower drain cover down, set them aside in a plastic bag or cup.
- After removing all the screws, the next step is to lift the drain cover and open it. To do this, you need to put the screwdriver into any of the holes near the rim of the drain cover.
- Push the screwdriver’s handle down, ensuring that the screwdriver’s tip is under one of the holes. Now, you can slowly and gently pry the shower drain cover and lift it.
- Suppose you’re facing trouble using a regular screwdriver. In that case, you could try prying the shower drain cover by using the edge of a flathead screwdriver.
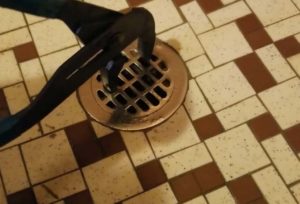
If you find that using the screwdriver to lift the drain cover off doesn’t work, you could use the nose pliers instead. Please note that you must try using the nose pliers only after removing the screws holding the drain cover in place. To test this tip, all you need to do is:
- Take two nose pliers, and insert each pair into a hole simultaneously. It would be best to insert the nose pliers on either end of the drain cover in two holes that oppose each other.
- Holding the handles of each pair of pliers firmly, twist both pliers in one direction to loosen the drain cover.
- As you continue to twist both pliers in the same direction, we urge you to keep turning the pliers slowly as you loosen and eventually replace the drain cover.
When using nose pliers, we would also recommend that you use them carefully and without too much force. You could risk bending or damaging the shower drain cover if you do.
How to Replace a Shower Drain Cover Without Screws

The replacing process is much quicker and simpler when it comes to removing a shower drain cover that doesn’t have screws.
Here’s what you will need:
- A flathead screwdriver
- A pair of nose pliers
- A Phillip screwdriver
It’s important to remember several kinds of shower drain covers without screws. However, the removal process for all of them is pretty similar! We’ll be breaking the steps down according to each type of cover without screws.
Also read: How To Remove Shower Drain Without Screws
Toe touch and pop-up drain covers
Toe touch and pop-ups drain are very easy to clean, thanks to the fact that they are easy to open and replace. All you have to do is touch it with your toe, and it opens!
To replace a toe touch and pop-up drain cover, you need to do the following:
- Touch the top of the drain with your toe so that it pops up and opens.
- Next, remove the drain cover by unscrewing the lid.
- After that, you need to take the flathead screwdriver and unscrew the bottom of the drain cover.
- Once you’ve unscrewed it, you can easily lift out the drain cover and remove it from the drain.
- Then replace it with the new one.
Trip-lever drain covers
Next up is the trip-lever drain cover. These drains are a little more challenging to replace, so please read through the steps below a few times before trying out this replacement method. They have two separate parts: a plunger and a stopper.
To replace this type of drain cover, you will need to:
- First, take the Phillips screwdriver and use it to unscrew the attached lever to your bathroom wall or bathtub.
- Once you’ve removed the lever, you need to remove the stopper from the drain then. If you’re having trouble figuring out where the stopper is, look into the drain. The stopper goes directly into the drain.
- After that, use your hands to rotate the grated cover that is on top of the base of the drain.
- Next, you need to take off the drain base, and you’ve successfully removed the shower drain cover.
- Grab the new shower drain cover and follow the same process in reverse sequence. And that’s it. You replace the drain cover.
Push and pull drain covers
The final type of drain cover that doesn’t have screws is the push and pull drain cover. Thankfully, they are also relatively easy to replace! One of the best features of these drain covers is that they are similar to the toe touch and pop-up drain covers. The only difference is that these drain covers need you to pull them open and push them shut. You will need a flathead screwdriver for this type of drain cover.
Here’s how you remove and replace a push and pull drain cover:
- First, you need to pull the drain and make sure it is open.
- At the top of the drain cover is a knob. Your first job is to rotate the knob to unscrew it. It might be a little tight or hard to unscrew since you don’t usually unscrew it otherwise, so you might need to use a towel or any other piece of cloth to help you.
- After removing the knob, you need to look inside the knob’s opening. It is in the shape of a square. Insert your flathead screwdriver into the space and rotate it anticlockwise.
- After twisting the screwdriver a few times, then the drain cover will loosen.
- Once you’re satisfied that the drain cover is loose enough, gently remove it from the ground and then replace it with a new exact drain cover.
If you want to learn the removal process in detail then read our step-by-step guide on removing shower drain cover.
Cleaning Out The Clogged Shower Drain
Once you’ve cleaned out your shower drain, you want to make sure that you clean it thoroughly. Here are a few methods to unclog your shower drain.

One of the easiest and cheapest ways to unclog a shower drain is to pour boiling water down it! Boiling water is ideal for those who want to get rid of soap and shampoo that has built up over time. We wouldn’t recommend trying out this method if you can see that a chunk of hair or any dirt entirely obstructs water flow.
All you need to do is boil a pot of water and pour it directly down your drain. Hot water can help soften the built-up soap and shampoo and allow water to flow better.
Use baking soda and white vinegar
The combination of white vinegar and baking soda makes for a dream team that helps eliminate virtually any household problem! This combination does everything from killing insects and bugs to cleaning dishes.
Pour equal baking soda and white vinegar parts down your shower drain one after the other in the order mentioned. Let the mixture work its magic and sit in the drain for about 15 to 20 minutes. Once that time has passed, pour a pot of boiling water down the drain.
The combination of baking soda and vinegar helps melt any grease and dirt that has built up over time in your shower drain, while the boiling water that your pour down afterward helps flush the gunk out for good.
Also read: How To Remove Linear Shower Drain Cover
How Often Should You Clean the Shower Drain and Why Is It Important?
It would help if you cleaned your shower drain at least once a month. If you are pressed for time and cannot manage to do so once a month, it would be best if you tried to clean the drain at least once every two months.
It’s essential to clean your shower drain regularly for various reasons. First, regular cleaning prevents clogs from forming in your shower drain. If you don’t clean out your shower drain and let clogs form, you could upset your plumbing system and cause blockages in your pipes. As a result, the pipes could rupture, and you could have an expensive and irritating plumbing emergency on your hands.
Shower Drain Cover Replacement
When replacing your shower drain cover, please take note of the make and model of your old drain cover. Otherwise, you could risk purchasing the wrong kind of drain cover. We would also recommend hiring a plumber to replace your shower drain cover instead of trying to do it yourself. Even though removing a drain cover is easy, reinstalling it is tough and easy to mess up if you are not a trained professional.
Wrapping up
In this article, I walked you through an extensive amount of information on how to replace a shower drain cover. Even though the steps mentioned in all the methods are easy to follow, plumbing can be difficult if you’ve never done it before. Please make sure you read through all the instructions carefully before trying them out! I hope they help you.
